Asp.Net Core 2.2 + React 環境構築してみた。
こんにちは!ハラダITサポート 代表の原田です。
今回はAsp.Net Core 2.2でReact.jsを使うための環境構築について書きます。
Asp.Net Core 2.2の環境構築については以前書いた『.NetCore2.2(ASP)の実行環境をDocker(CentOS7 + MySql + Apache)で作成してみた。』を見てみてください。
※今回は開発サーバで実行して確認するので使わないです。
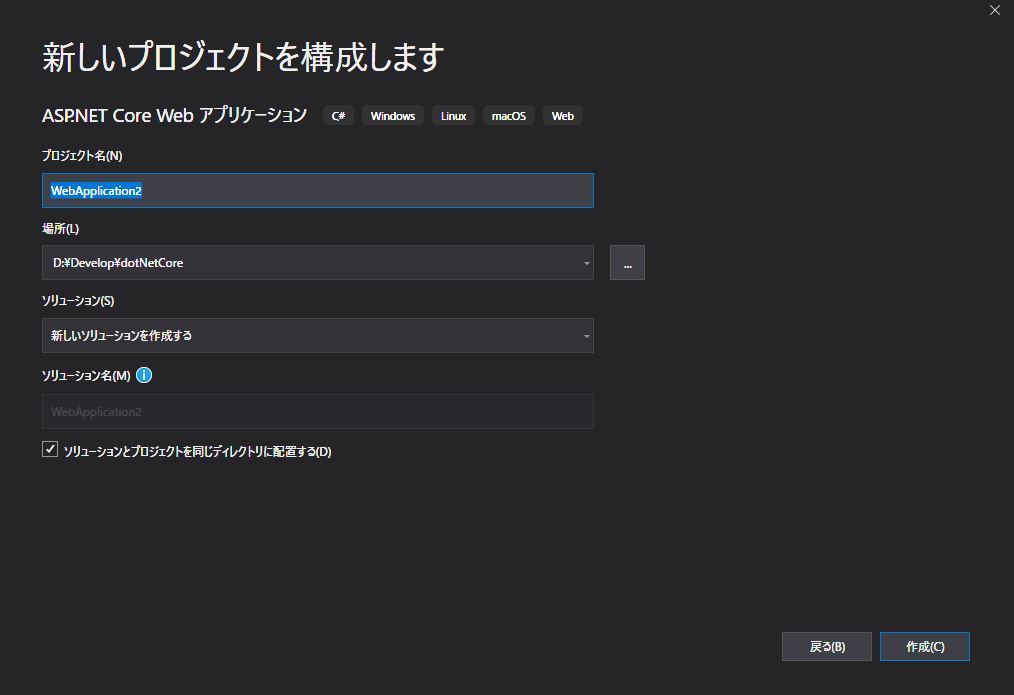
1. 適当なASP.NET Core Web アプリケーション を作る
1-1. ASP.NET Core Webアプリケーションを選択して次へボタンをクリック

1-2. ソリューションの保存場所を決めて作成ボタンをクリック
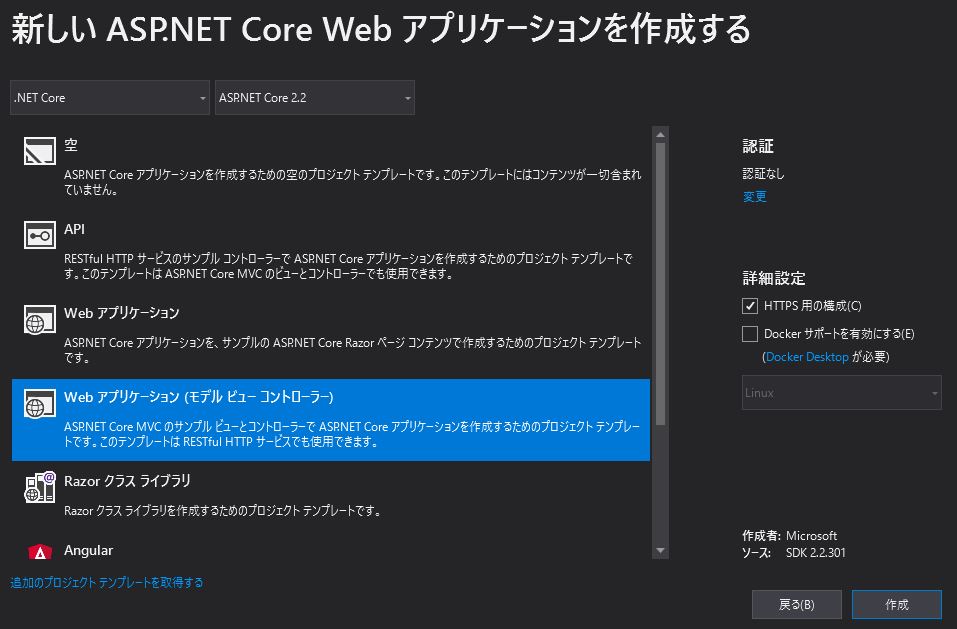
1-3. Webアプリケーションモデル(MVC)を選択して作成ボタンをクリック
これで作成できます。
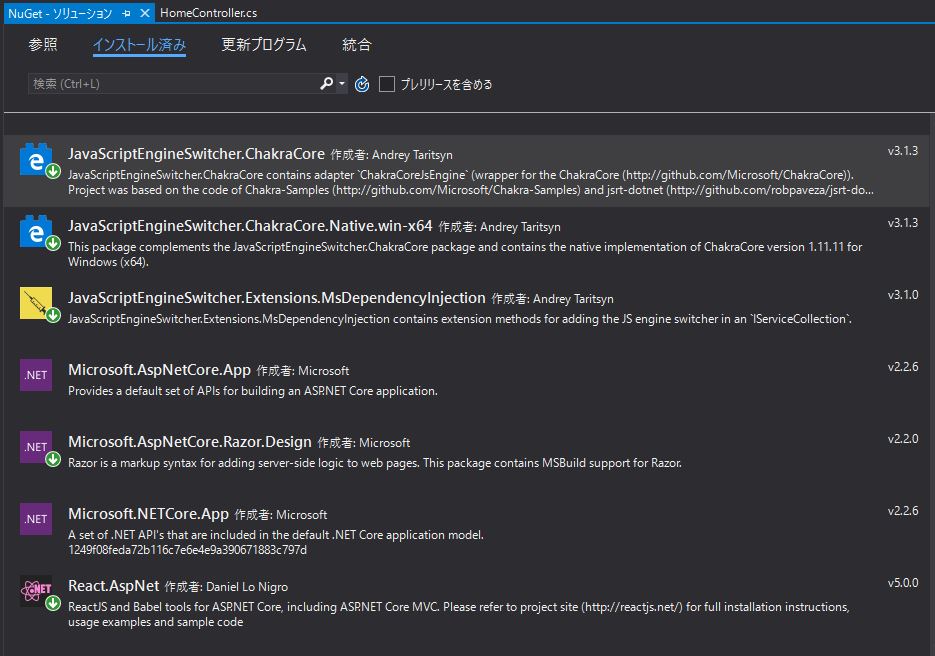
2. NuGetで必要なプログラムをインストールする
2-1. メニューのツール⇒NuGetパッケージマネージャ⇒ソリューションのNuGetパッケージの管理を実行
下記の4つをインストールする。
React.AspNet
JavaScriptEngineSwitcher.Extensions
JavaScriptEngineSwitcher.ChakraCore
JavaScriptEngineSwitcher.ChakraCore.Native.win-x64
3. その他作業
3-1. Reactチュートリアル用のJSXファイルを追加
wwwroot-js-Tutorial.jsxを作成する。
内容は下記の通り。※[Reactチュートリアル]の内容です。
class CommentBox extends React.Component {
    render() {
        return (
            <div className="commentBox">Hello, world! I am a CommentBox.</div>
        );
    }
}

ReactDOM.render(<CommentBox />, document.getElementById('content'));
3-2. Startup.cs に設定を追加
usingとConfigureServicesとConfigureに下記のReact用の部分のコードを追加します。
※ Initialise ReactJS.NET. Must be before static files.については書いてある通り、『app.UseStaticFiles();』の前に記述してください。
// React用
using JavaScriptEngineSwitcher.ChakraCore;
using JavaScriptEngineSwitcher.Extensions.MsDependencyInjection;
using React.AspNet;

namespace WebApplication2
{
    public class Startup
    {
        ... 中略 ...
        // This method gets called by the runtime. Use this method to add services to the container.
        public void ConfigureServices(IServiceCollection services)
        {
            ... 中略 ...
            // React用 --------------------------------------------------------------
            services.AddSingleton<IHttpContextAccessor, HttpContextAccessor>();
            services.AddReact();

            // Make sure a JS engine is registered, or you will get an error!
            services.AddJsEngineSwitcher(options => options.DefaultEngineName = ChakraCoreJsEngine.EngineName)
              .AddChakraCore();
            // ----------------------------------------------------------- React用
        }
        ... 中略 ...
        // This method gets called by the runtime. Use this method to configure the HTTP request pipeline.
        public void Configure(IApplicationBuilder app, IHostingEnvironment env)
        {
        ... 中略 ...
            // React用 --------------------------------------------------------------
            // Initialise ReactJS.NET. Must be before static files.
            app.UseReact(config =>
            {
                // If you want to use server-side rendering of React components,
                // add all the necessary JavaScript files here. This includes
                // your components as well as all of their dependencies.
                // See http://reactjs.net/ for more information. Example:
                //config
                //  .AddScript("~/js/First.jsx")
                //  .AddScript("~/js/Second.jsx");
                // If you use an external build too (for example, Babel, Webpack,
                // Browserify or Gulp), you can improve performance by disabling
                // ReactJS.NET's version of Babel and loading the pre-transpiled
                // scripts. Example:
                //config
                //  .SetLoadBabel(false)
                //  .AddScriptWithoutTransform("~/js/bundle.server.js");
            });
3-3. _ViewImports.cshtmlに設定を追加
@using React.AspNet3-4. Home - Index.cshtmlへCDNと出力タグを追加
既存のコードはそのままでもコメントアウトしてもなんでもよいです。
<!-- React CDN -->
<script src="https://cdnjs.cloudflare.com/ajax/libs/react/16.8.0/umd/react.development.js"></script>
<script src="https://cdnjs.cloudflare.com/ajax/libs/react-dom/16.8.0/umd/react-dom.development.js"></script>

<div id="content"></div>
<script src="@Url.Content("~/js/Tutorial.jsx")"></script>
4. 実行
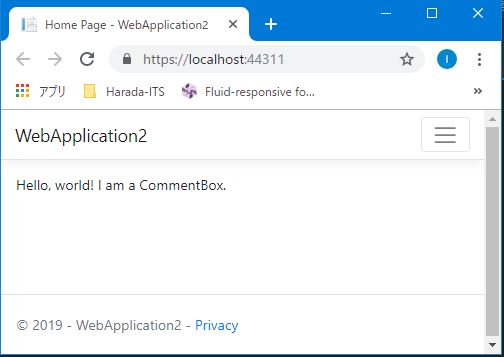
F5キーを押して開発サーバで実行すると下記の画面が表示されるはず。
『Hello, world! I am a CommentBox.』という部分がTutorial.jsxで生成して出力した部分になります。
いかがでしたでしょうか?
今回はReactチュートリアルの一番最初だけでしたが、他のチュートリアルもこの環境で試すことができます。
あなたの猫の手になりたいHarada IT Support 代表の原田でした。
何かあればお気軽にコメントよろしくお願いします。
Follow me!